What is Microsoft Outlook Connecter?

The Outlook Connector enables two-way synchronization of e-mail messages, calendar items, contacts, tasks, and notes between Outlook and Windows Live Hotmail.

Note Calendar synchronization with Outlook is a paid, subscription-only feature. When you subscribe to Windows Live Hotmail, you get to synchronize notes and tasks as well as your calendar.

If you do not have a Windows Live Hotmail account, you can either sign up for a new account or update your existing MSN Hotmail account to be a Windows Live Hotmail account.

To update from MSN Hotmail to Windows Live Hotmail, click the Join Windows Live Hotmail link when you log on to your account. All of your messages, folders, and contacts will automatically appear in your new account. Your e-mail address will not change. I want to share my Experience with Microsoft Outlook Support and Computer help

How to Add holidays and events in Outlook

1. On the Tools menu, click Options, and then click Calendar Options.

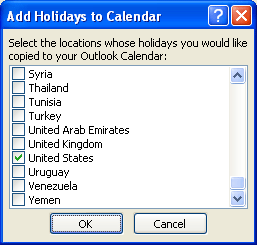
2. Under Calender click add Holiday


  1. Select the check box next to each country/region whose holidays you want to add to your calendar, and then click OK.

Note Your own country/region is automatically selected.

If you already added a country's or region's holidays to your calendar, the check box for that country/region is selected in the Add Holidays to Calendar dialog box. If you try to add the same items again, you receive the following message:

Holidays for country/region are already installed. Do you want to install them again?

If you click Yes, the holidays and events are installed a second time, and you see duplicate holiday and event entries.

Note The holiday information that is provided with Outlook includes items during calendar years 2006 through 2012. If you are using a non-Gregorian calendar, items that occur during the same time period are included. I want to share my experience with Microsoft Outlook Support and Computer Help

How to Reduce Spam in Outlook

There are some guidelines given below which is help to reduce Spam. These are following….

  1. Take advantage of the Junk E-mail Filter in Microsoft Office Outlook 2007 Office Outlook 2007 helps to mitigate the problem of spam by providing the Junk E-mail Filter, which automatically evaluates incoming messages and sends those identified as spam to the Junk E-mail folder.
  2. Block pictures in HTML messages that spammers use as Web beacons Office Outlook 2007 has an additional anti-spam feature. By default, this feature blocks automatic picture downloads and other external content in messages if the content is linked to a server. If you open a message that has external content when this feature is turned off, the external content downloads automatically, inadvertently verifying to the server that your e-mail address is a valid one. Your e-mail address can then be sold to a spammer. You can unblock external content for messages that come from sources that you trust. For details, see Block or unblock automatic picture downloads in e-mail messages.
  3. Turn off read and delivery receipts and automatic processing of meeting requests Spammers sometimes resort to sending meeting requests and messages that include requests for read and delivery receipts. Responding to such meeting requests and read receipts might help spammers to verify your e-mail address. You can turn off this functionality. However, read and delivery receipts and automatic processing of meeting requests are useful features that you should not be afraid to use within a secure corporate network.

Note Delivery receipts can be turned off only by your e-mail server administrator.

Turn off read receipts

    1. On the Tools menu, click Options.
    2. Click E-mail Options.
    3. Click Tracking Options.
    4. Under Use this option to decide how to respond to requests for read receipts. Only applies to Internet Mail accounts, click Never send a response.

Turn off automatically acceptance of meeting requests

1. In Outlook, on the Tools menu, click Options, and then click Calendar Options.

2. Under Advanced options, click Resource Scheduling.

3. Clear the Automatically accept meeting requests and process cancellations check box.

4. Limit the places where you post your e-mail address Be cautious about posting your e-mail address on public Web sites, such as newsgroups, chat rooms, bulletin boards, and so forth. When visiting public sites, you might want to use an e-mail address that is different from your main e-mail address. Remove your e-mail address from your personal Web site. Whenever you list or link to your e-mail address, you increase your chances of being spammed.

5. Review the privacy policies of Web sites When you sign up for online banking, shopping, or newsletters, review the privacy policy of the site carefully before you reveal your e-mail address or other personal information. Look for a link or section (usually at the bottom of the Web site's home page) called "Privacy Statement," "Privacy Policy," "Terms and Conditions," or "Terms of Use." If the Web site does not explain how your personal information will be used, consider not using the services at that site.

6. Watch out for check boxes that are already selected When you shop online, companies sometimes add a check box that is already selected, which indicates that it is fine with you if the company sells or gives your e-mail address to other businesses (or "third parties"). Clear this check box so that your e-mail address is not shared.

7. Don't reply to spam Never reply to an e-mail message — not even to unsubscribe from a mailing list — unless you know and trust the sender, such as when the e-mail message comes from a service, an online store, or newsletter that you have signed up with. Answering spam just confirms to the spammer that your e-mail address is an active one.

8. If a company uses e-mail messages to ask for personal information, don't respond by sending a message Most legitimate companies will not ask for personal information to be sent in e-mail. Be suspicious if they do. Such a request could be a spoofed e-mail message disguised to look like a legitimate one. This tactic is known as phishing. If the possible spam appears to be sent by a company that you do business with — for example, your credit card company — then call the company to verify that they sent it, but don't use any phone number that is provided in the e-mail. Instead, use a number that you find by using other means, such as directory assistance, a statement, or a bill. If the request is a legitimate one, the company's customer service representative should be able to assist you. The Junk E-mail Filter also includes phishing protection to help identify and disable suspicious messages.

9. Don't contribute to a charity in response to a request sent in e-mail Unfortunately, some spammers prey on your goodwill. If you receive an e-mail appeal from a charity, treat it as spam. If the charity is one that you want to support, locate their telephone number or Web site to find out how you can make a contribution.

10. Don't forward chain e-mail messages Besides increasing overall e-mail volume, by forwarding a chain e-mail message you might be furthering a hoax — and meanwhile, you lose control over who sees your e-mail address.

I hope It is useful to Getting information about Spam and I want to share my experience with Microsoft Outlook Support and Computer Help.

Password protection of Microsoft Outlook

Currently there is no way to password protect Outlook on startup or to lock Outlook if you need to quickly walk away from your computer other than by using your Microsoft Windows® logon password or by using third-party software written specifically to password protect Outlook. However, you can set a password on your Personal Folders file (.pst) (Personal Folders file (.pst): Data file that stores your messages and other items on your computer. You can assign a .pst file to be the default delivery location for e-mail messages. You can use a .pst to organize and back up items for safekeeping.). If you use an Internet e-mail account in Outlook, such as a POP3 (POP3: A common protocol that is used to retrieve e-mail messages from an Internet e-mail server.) or HTTP (HTTP (Hypertext Transfer Protocol): Protocol that is used when you access Web pages from the Internet. Outlook uses HTTP as an e-mail protocol.) account, your e-mail messages are delivered to a .pst data file on your computer's local hard disk. You can use a password on your .pst file to help prevent accidental intrusion by other people whom you share your computer with.

  1. On the Go menu, click Folder List.
  2. Do one of the following:
    • If you have a POP3 e-mail account, right-click the Personal Folders folder, and then click Properties For "Personal Folders" on the shortcut menu.
    • If you have an HTTP e-mail account (not supported in Outlook 2000), such as MSN® Hotmail®, right-click the Hotmail folder, and then click Properties For "Hotmail" on the shortcut menu.
  3. On the General tab, click Advanced.
  4. Click Change Password.
  5. In the Change Password dialog box, type your new password and verify it by typing it a second time. The password can be up to 15 characters.

Note Use strong passwords that combine upper- and lowercase letters, numbers, and symbols. Weak passwords don't mix these elements. Strong password: Y6dh!et5. Weak password: House27. Use a strong password that you can remember so that you don't have to write it down.

  1. Make sure that the Save this password in your password list check box is cleared. This prevents the password from being cached, and you need to type the password each time you run Outlook. Don't forget the password.
  2. Click OK three times.

When you click the e-mail account folder, you will be prompted for your password. After you gain access, you won't have to enter the password again for that session. If you exit and then restart Microsoft Outlook, you will be prompted for the password when you click the e-mail account folder.

Important The .pst password feature is not intended to provide security against hackers. It is just a way to prevent inadvertent intrusion by other people whom you trust and share your computer with, such as at home with your family. A more secure way of protecting your data on a computer that you share with other people is to create a password-protected Windows user account for each individual using the computer Help

Repairing an Offline Folder file (.ost)

You may want to scan and repair your .ost if you:

  • Encounter a large numbers of conflict items.
  • Cannot open particular Outlook items when offline.
  • Receive unexpected synchronization error messages (as shown in the synchronization log in the Deleted Items folder).
  • Receive the message:

Unable to expand the folder. The set of folders could not be opened. Errors could have been detected in the file drive:\Documents and Settings\user\Local Settings\Application Data\Microsoft\Outlook\Outlook.ost. Quit all mail-enabled applications, and then use the Inbox Repair Tool.

Note The file path specified in the message may vary depending upon the operating system you are using on your computer.

In addition, you might be able to open folders in the .ost but get synchronization error messages that do not go away. This happens when a single e-mail message is damaged and the synchronization process cannot correct it. You can use the OST Integrity Tool to fix damaged messages or to move them so you can synchronize successfully.

Important: You may need to run scanpst.exe (see the first procedure above) first if the OST Integrity Tool cannot open the .ost file. If you want to troubleshoot your computer you can get Computer Help

To scan and repair the .ost file

  1. Close Outlook.
  2. On the Start menu, click Run.
  3. In the Open box, type

drive:\Program Files\Common Files\System\Mapi\LocaleID\scanost.exe

where LocaleID is the locale identifier (LCID) for your installation of Microsoft Office. For example, the LCID for English (United States) is 1033. For a list of LCIDs, see Microsoft Office Help.

  1. Click OK.
  2. Click either Scan all folders or Choose folder to scan. If you click Scan all folders, this may take several minutes.
  3. Select the Repair errors check box.
  4. Click Begin Scan.

Details of actions performed during the scan and repair are saved as a message in your Outlook Deleted Items folder with the subject "OST Integrity Check."

If the Offline Folder file cannot be repaired, you can disable it and create a new one.

To disable the .ost file and create a new one

  1. On the Tools menu, click E-mail Accounts, click View or change existing e-mail accounts, and then click Next.
  2. In the list, click Microsoft Exchange Server, and then click Change.
  3. Click More Settings.
  4. Click the Advanced tab, and then click Offline Folder File Settings.
  5. Click Disable Offline Use.
  6. In the File box, type the path to the file you want to use as the new .ost file. The default file name is outlook.ost. If this file name already exists, you are prompted for a new name.

Repairing a Personal Folders file (.pst)

You may need to use the Inbox Repair Tool if you open your Outlook .pst file and receive this message:

Unable to expand the folder. The set of folders could not be opened. Errors could have been detected in the file drive:\Documents and Settings\user\Local Settings\Application Data\Microsoft\Outlook\Outlook.pst. Quit all mail-enabled applications, and then use the Inbox Repair Tool.

Note The path to the file specified in the message may vary depending upon the operating system you are using on your computer.

To repair the .pst file

  1. On the Start menu, click Run.
  2. In the Open box, type

drive:\Program Files\Common Files\System\Mapi\LocaleID\scanpst.exe

where LocaleID is the locale identifier (LCID) for your installation of Microsoft Office. For example, the LCID for English (United States) is 1033. For a list of LCIDs, see Microsoft Office Help.

  1. Click OK.
  2. In the Enter the name of the file you want to scan box, type the path and file name given in the error message above.

Note You may not be able to use the Browse button to locate this file because it is located in a hidden folder.

  1. To change the options for logging errors during the scan, click Options. If you choose Replace log or Append to log, the log file is saved to the same directory as the .pst file.
  2. Click Start.
  3. When the file scan is completed, select the Make a backup of scanned file before repairing check box.
  4. Click Repair.

If the file is successfully repaired, you will see a Repair complete message. If the Inbox Repair Tool was unable to repair the file, you will need to use a backup of your file.

To begin using your backup file as your new primary file

  1. Start Outlook.
  2. On the File menu, click Data File Management.
  3. Select the .pst that is damaged, and then click Remove.
  4. Click Add, select Personal Folders File (.pst), click OK, and then select the .pst file you want to use as the new primary file.
  5. Click OK.

You should not rely solely on the Inbox Repair Tool for disaster recovery. A system of regular backups of your .pst file is an important part of preventing data loss. You can back up the file in several ways, including copying it to another location, backing up all of the files on your computer (help), or by using the Personal Folders Backup utility, available on the Microsoft Office Online site.

Powered by Blogger