How to Export Your Outlook Calendar


Have events in your calendar at work, but want to bring those same events home, for outlook at home. Here is How to Export Your Outlook Calendar.

Step 1: Open outlook, and click on the calendar folder. See picture

Step 2: This will open up the calendar section of MSOutlook

Step 3: ImportExport Option Outlook

Step 4: Now that the calendar is open go to the File menu at the top left.
Once on the file menu select the option for Import/Export

Step 5: Export Choices

Step 6: The next screen will ask you what you want to do.

Step 7: Select the choice for export to a file.

Step 8: Click Next

Step 9: Choose the type of file in this case since we will be going to outlook at home you want to select the "Personal File Folder" Option the ".pst" file

Step 10: Click Next

Step 11: The next screen will have your folder list, on this screen if you have subfolders under contacts the lower left hand corner allows to include subfolders of your Calendar. Leave the calendar option highlighted and click Next.

Step 12: It will now ask you for the location of the file, click on Browse to the right and click to save the file to your desktop for easy access later.

How to Retrieve Deleted Emails From Outlook Express

Outlook Support

Did you accidentally delete some important emails or other data from Outlook Express? Are you wondering if in Microsoft Outlook Recovering Deleted Items is possible? If so then you're in the right place as in this article I will show how to retrieve deleted emails from Outlook Express and easily be able to recover deleted items in Outlook.


First off you must realize that Microsoft office is a program that is installed on your hard drive. And what you should know is that when a file is deleted of your hard drive it isn't permanently deleted. Instead when a file gets deleted, all that happens is that the space that was occupied by the file is now freed-up and listed as new re-usable space. Now until that space is overwritten by new data, your old file is still there and can be easily retrieved, provided you have the right tools.


The program you will need to retrieve deleted mails from outlook express is called Data Recovery Pro. It is a great program designed for Data Recovery and it has a special feature dedicated just for recovering deleted emails. It is very easy to use and Free to download, the software should recover deleted outlook items in a few minutes at the click of a couple of buttons.


Therefore if you needed to know if in Microsoft Outlook recover deleted items is possible then it sure is; all you need to do is get hold a proper data recovery tool and you should have your files back in no time. Personally I use a tool called Data Recovery Pro to Retrieve Deleted Emails from Outlook Express; it is very easy to use and free to download. Check it out below...


If you have Lost or deleted an important Email, then relax and Don't Panic! With the right Email Support you should have your files back in no time.

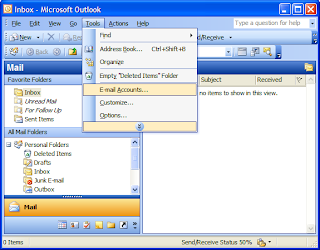
How do you set up outlook express to receive mail from a free online email account?

outlook support
Step 1. In Outlook Express, click the Tools menu, and then click Accounts.

Step 2. Click Add, and then click Mail.

Step 3. Type your name, and then click Next.

Step 4. Type your full Windows Live Hotmail e-mail address, and then click Next.

Step 5. Enter the following information, and then click Next:

  • In the My incoming mail server is a box, click POP3.
  • In the Incoming mail (POP3, IMAP, or HTTP) server box, type pop3.live.com.
  • In the Outgoing mail (SMTP) server box, type smtp.live.com

Step 6. Type the account name and the password for your Windows Live Hotmail account. Clear the Remember password check box unless you're the only person with access to the computer. Make sure that the Log on using Secure Password Authentication (SPA) check box isn't selected.

Step 7. Click Next, and then click Finish.

Step 8. In the Internet Accounts window, click the Mail tab, click the Windows Live Hotmail account that you added, and then click Properties.

Step 9. Click the Advanced tab, and under Server Port Numbers, enter the following information, and then click OK:
  • In the Incoming mail (POP3) box, type 995.
  • In the Outgoing mail (SMTP) box, type 25.
  • Under both Outgoing mail (SMTP) and Incoming mail (POP3), select the This server requires a secure connection (SSL) check box.

Step 10. Click Close.

Powered by Blogger